

Thank you Swift Evo from DeSci Asia for reviewing this article and the ENS Public Goods Builders Grant for funding this work.
Decentralized science, or DeSci, uses open and decentralized technologies to experiment with new ways of funding, creating, reviewing, crediting, and sharing research. You do not need to launch a token or join a DAO to begin. A practical first step is to establish a recognizable onchain identity and use it to explore a DeSci platform.
In this guide, you will register an Ethereum Name Service name, set it as your primary name, create a FunDeSci account, and connect the wallet that owns the name. By the end, you will be ready to explore research projects and communities without being required to buy an NFT, fund a project, or publish anything.
Important distinction: An ENS name is attached to your wallet. It does not replace your FunDeSci email, Google login, or password. FunDeSci currently presents account creation and wallet connection as separate actions. The site may show your wallet address even after you set a primary ENS name, because each application chooses whether and how to resolve ENS names.
DeSci is a broad movement rather than one website. Its projects explore public research infrastructure, open collaboration, alternative funding, verifiable attribution, and transparent records.
ENS, the Ethereum Name Service, lets you associate a readable name such as yourname.eth with an Ethereum address. A primary ENS name can help ENS-aware applications display that name instead of a long 0x address. ENS is your onchain identity layer in this tutorial.
FunDeSci is a DeSci platform for discovering research, participating in communities, publishing results, and supporting projects. Your FunDeSci account is your platform profile; your connected wallet is the account you use for blockchain interactions.
You will need:
An Ethereum-compatible self-custody wallet. FunDeSci's current wallet picker includes MetaMask, WalletConnect, Coinbase Wallet, Trust Wallet, Rabby Wallet, Rainbow, and Ledger.
Enough ETH on Ethereum Mainnet for the ENS registration fee and network gas. ETH on an L2 such as Base, Arbitrum, Optimism, or Polygon cannot pay for a Mainnet .eth registration.
An email address and password, or a Google account, for FunDeSci account creation.
A stable browser session and several uninterrupted minutes for ENS registration.
If you still need a wallet, begin with the official guidance from your chosen provider. MetaMask users can consult its official safety guidance.
Never enter your Secret Recovery Phrase or private key into ENS, FunDeSci, a pop-up, or a support chat. Legitimate wallet connection does not require it.
Check the domain before connecting: use app.ens.domains for ENS and fundesci.com for FunDeSci.
Read every wallet prompt. Confirm the selected account, network, destination, requested permission, and estimated cost.
A signature proves control of a wallet and normally does not spend ETH. An onchain transaction changes blockchain state and can charge gas. A wallet prompt should tell you which one you are approving.
Ethereum Mainnet gas is variable, and transactions are public and generally irreversible. If a prompt is unexpected or unclear, reject it and investigate.
Go directly to app.ens.domains. Select Connect, choose your wallet, and approve the connection request. Connecting lets the site view the selected public address; it is not the registration transaction.
Enter the name you want in Search for a name. The ENS app will add .eth when appropriate and report its current status. Available means it can be registered at the standard rate. A registered, grace-period, premium, invalid, or too-short name needs a different decision; the official status guide explains each label.
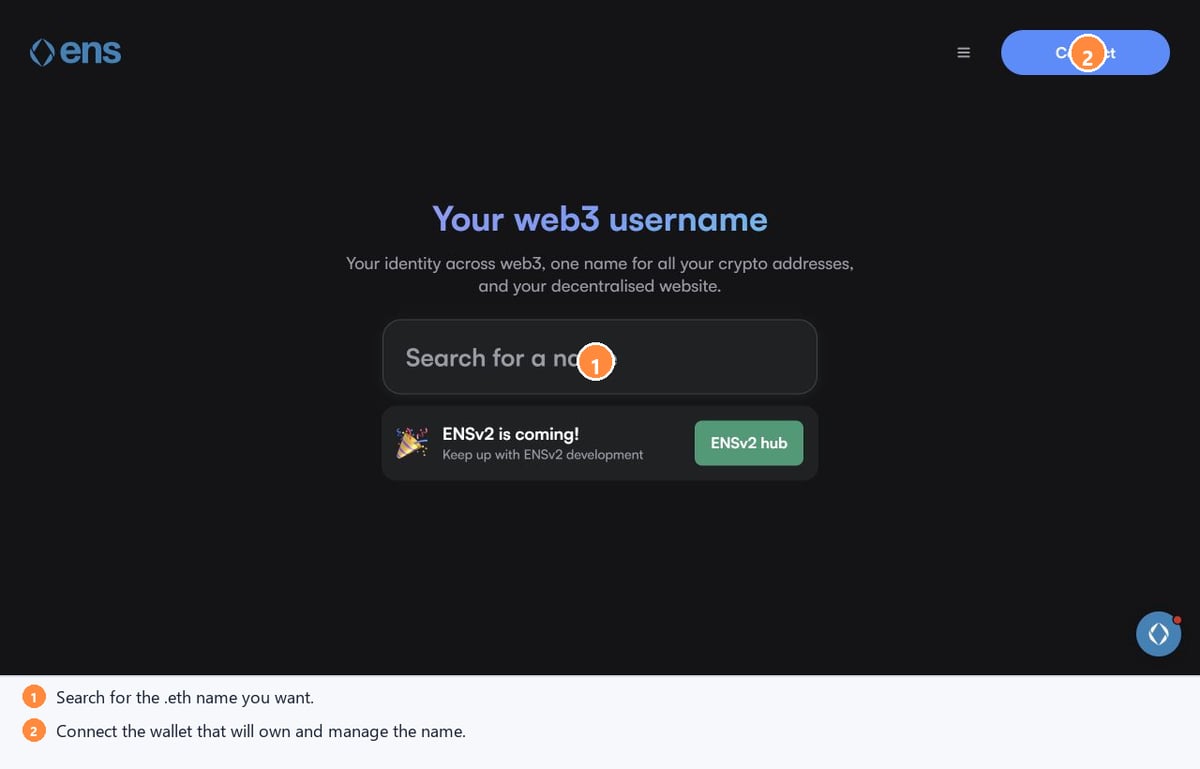
Start at the official ENS app, search for a name, and connect the wallet that should own it.
Open an available name and choose the registration duration. The interface may let you specify years or pick an expiry date. A longer registration reduces the need to submit a renewal transaction every year, but it also increases the registration fee paid now.
Review the live estimate shown by ENS. The total consists of the registration fee plus Ethereum network gas. Name length and registration duration affect the registration component; network demand affects gas. Recently expired names may also carry a temporary premium. Because these inputs change, rely on the quote in your own ENS session and the current official ENS pricing page—not a price copied from a tutorial.
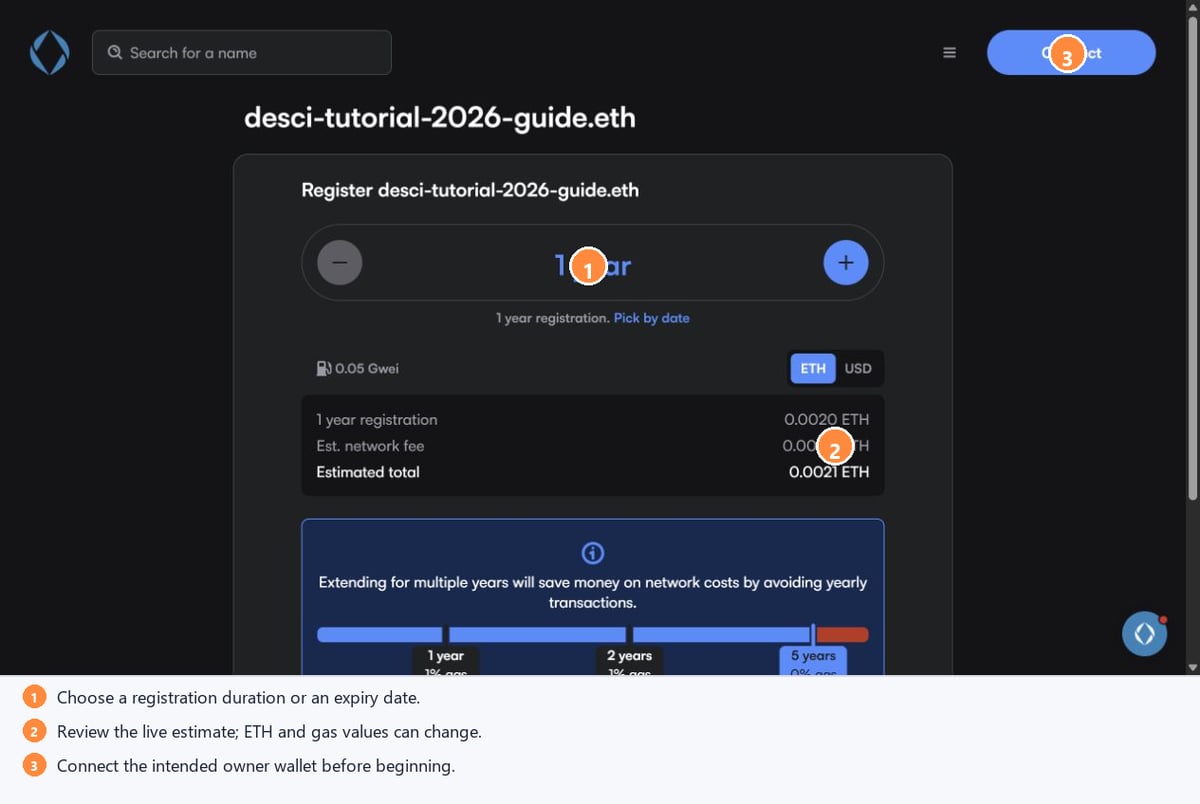
The displayed values are an example captured at one moment, not a promised price. Your wallet shows the amount you are actually asked to approve.
ENS uses a commit-and-reveal process to reduce name sniping. According to the official registration guide, the sequence is:
Select Begin and approve the commit transaction. The transaction sends no registration payment, but it does require Mainnet gas.
Keep the same browser session open and wait for the approximately 60-second timer.
Select Complete Registration and inspect the second wallet prompt. This transaction includes the registration fee and gas.
Wait for confirmation before closing the flow.
The first transaction does not reserve the name. Do not clear the browser cache, switch browsers, or replace/speed up the commit while the flow is in progress. ENS stores a secret in the browser that must match the onchain commitment. Complete the second transaction promptly; the commitment eventually expires.
A primary name creates the reverse association applications use when they start with your wallet address and want to display an ENS name.
In the ENS app, open the name you just registered.
Open its Profile area and confirm that its ETH Address points to the wallet you intend to use.
Select Set as Primary Name.
Review and approve the wallet prompt. This is an onchain action and requires Mainnet gas.
After confirmation, look for the Your primary name badge and for your
.ethname in the ENS app header.
Only the wallet set as the name's ETH Address can set that name as primary. If the ETH Address does not already point to your wallet, ENS may require an additional transaction. Use the official primary-name instructions if the button is missing or the connected wallet has a different role.
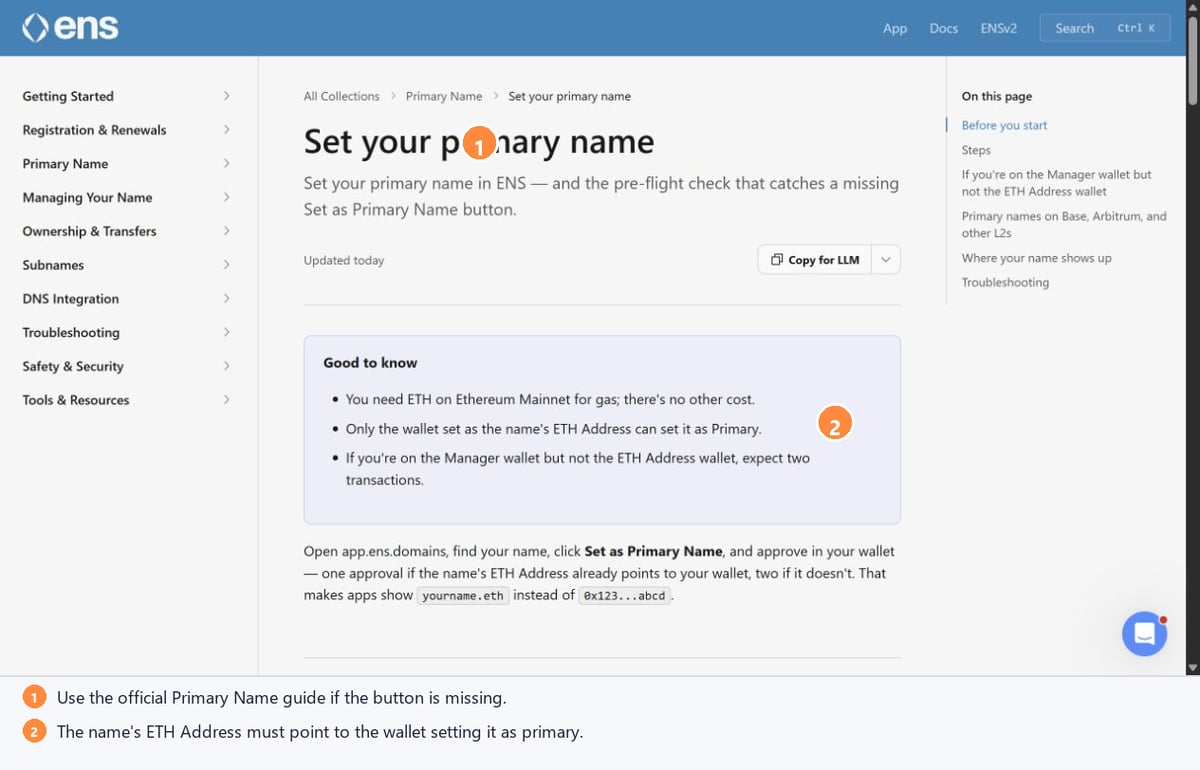
The primary-name setting helps ENS-aware apps display your name; it does not force every app to do so.
Open FunDeSci and select Sign Up / Log In in the header. On the sign-in panel, select Sign up if the Create Account form is not already visible.
Choose one of the current account methods:
Continue with Google, then complete Google's authorization flow; or
Enter an email, create a unique password, confirm it, and select Create Account.
Read the linked terms and privacy policy before submitting. Follow any email, Google, or profile-completion prompts that appear. FunDeSci can change the optional profile fields over time, so complete only the information you are comfortable making part of your platform profile.
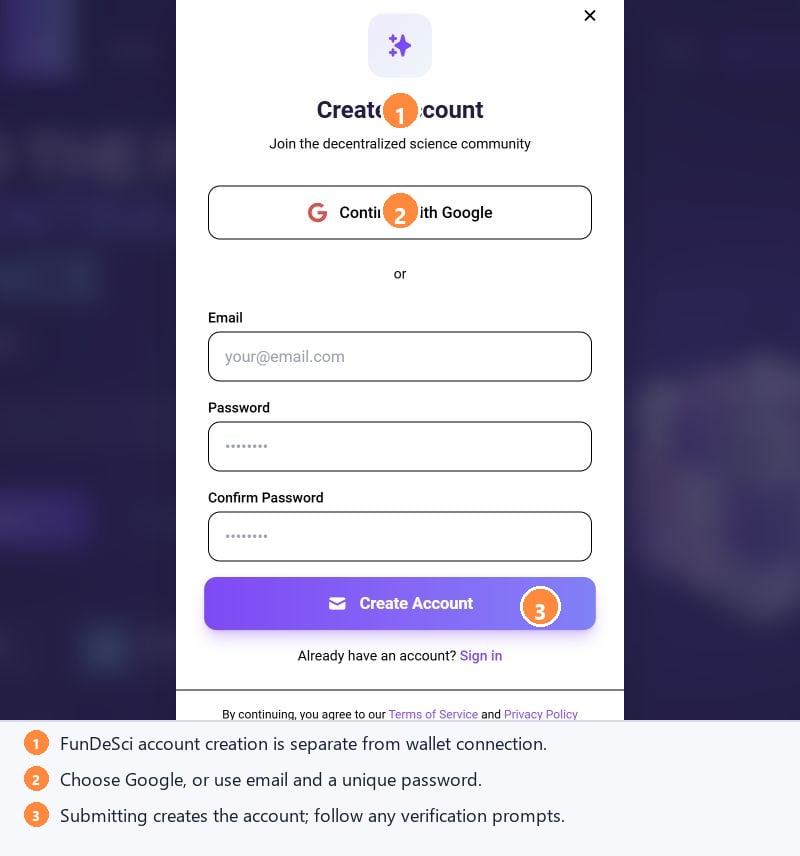
Creating a FunDeSci account is an offchain platform action. It is separate from connecting your Ethereum wallet.
Return to the FunDeSci header and select Connect Wallet. Choose the same wallet provider and account you used to register the ENS name. If you use WalletConnect, follow the QR-code or deep-link instructions shown by your wallet.
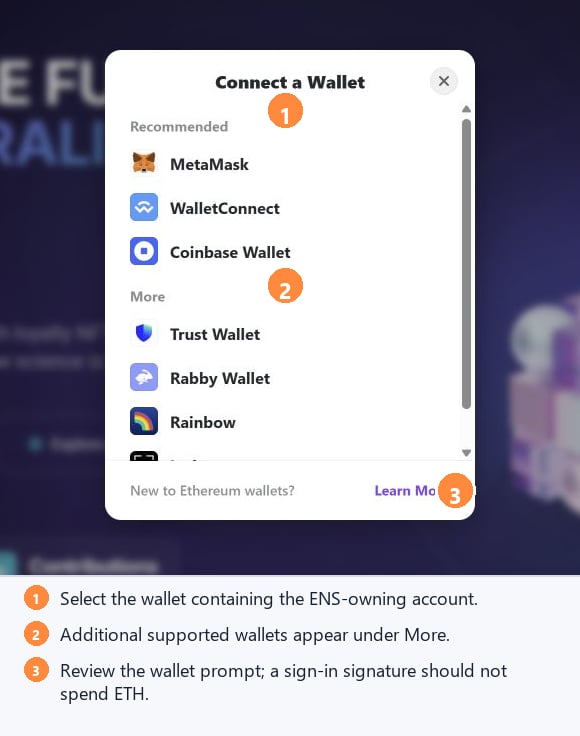
Select the ENS-owning account, then carefully review the request in your wallet.
Approve the connection request. If FunDeSci requests a sign-in signature, verify that it is a message signature—not a token transfer, approval, or paid transaction—and then sign only if the domain and selected address are correct. Connecting or signing in should not by itself require gas. A later action such as minting, joining an onchain membership, or funding a project may require a transaction and network-specific assets.
To verify the connection:
Open your wallet and copy or inspect the selected public address.
Compare its first and last characters with the address FunDeSci shows in its header, account menu, or wallet panel.
Confirm that this is the same address listed as the ETH Address for your ENS name.
Do not treat the absence of your
.ethname in FunDeSci as a failed connection. Address display and ENS-name display are different features.
With your account and wallet connected, you can create a Profile, create a Project to receive, browse Projects, Discovery, and Communities, read public research information, fund projects, and inspect the network and payment requirements attached to individual opportunities. FunDeSci supports activity across multiple networks, so a community or project may use a network other than Ethereum Mainnet.
Stop before any mint, membership, donation, or funding confirmation unless you understand the asset, network, amount, gas estimate, and smart-contract permission. Creating the account and browsing do not obligate you to purchase anything.
The ENS name is not available. Search for another name. Do not assume a grace-period name can be registered immediately, and inspect any premium before proceeding.
The wallet says the balance is insufficient. Confirm that the ETH is on Ethereum Mainnet and covers both the registration fee and changing gas estimate.
ENS is stuck after the first transaction. Stay in the original browser, do not clear its data, and wait for confirmation. If the commitment expires, restart through the official ENS app.
“Set as Primary Name” is missing. Check that the connected wallet is the name's ETH Address, not merely a manager or owner with different records.
FunDeSci connected the wrong account. Disconnect from FunDeSci, select the correct account in your wallet, and reconnect. Compare the complete address rather than relying on an account label.
FunDeSci shows
0x…instead of the ENS name. That can be normal. Your ENS records may be correct even when an application chooses to display the raw address.
No. Create the FunDeSci account with Google or email/password, then connect the ENS-owning wallet separately.
A basic connection request and an offchain sign-in signature should not cost gas. Registration, primary-name changes, token approvals, mints, and other onchain actions can cost gas.
Technically, you can connect a supported wallet, but this tutorial uses the ENS-owning address so your onchain identity and platform activity stay aligned. Always verify which address is active before signing.
No. A .eth registration has an expiry date and must be renewed. Record the expiry and renew early if you want to keep the name.
You now have three distinct pieces working together: a FunDeSci account for your platform profile, a wallet for blockchain interactions, and an ENS name for a readable onchain identity. Keep those roles clear, review every prompt, and begin with low-risk activities such as browsing projects and communities before deciding whether to participate onchain.
What else do you want to learn to participate in DeSci? Please share your feedback here.