Siphox Health Review
If you've been following along for a bit, you might remember that January is one of the months that I always do bloodwork to track the impact of the various health related experiments I do over the year. This month, in addition to my normal work done by InsideTracker, I also tested out a new system from Siphox Health. Read on for my Siphox Health Review and to see how it compares to using InsideTracker.Why Siphox? So why did I decide to give Siphox a try? If you've read my review of...

Growing Oyster Mushrooms with Hardwood Fuel Pellets
Most people who grow oyster mushrooms do so on a straw based substrate. This always seemed odd to me. Oyster mushrooms naturally grow on hard woods. In addition to this, making straw reasonably sterile for growing purposes is really annoying. I was surprised that there weren't more instructionals on using hardwood fuel pellets for growing oyster mushrooms. With the advent of pellet stoves and pellet grills, the availability of a wide variety of hardwoods in this format has grown exponent...
Building a Backyard Food Forest
I've written before about my desire to turn my backyard into a food forest using edible landscaping. I've always imagined a lush, thriving garden that requires minimal effort yet provides a bounty of products—all while resembling a natural forest ecosystem. My process of building a backyard food forest started after encountering the concept of permaculture. Rooted in ecological principles, permaculture is a holistic approach to creating sustainable systems that mimic nature’s patter...
My Transmutable Explorations and other musings.
Support J Donmoyer

Apple Grafting - Transmutable Explorations

Subscribe to J Donmoyer
Support J Donmoyer
Apple Grafting - Transmutable Explorations
Siphox Health Review
If you've been following along for a bit, you might remember that January is one of the months that I always do bloodwork to track the impact of the various health related experiments I do over the year. This month, in addition to my normal work done by InsideTracker, I also tested out a new system from Siphox Health. Read on for my Siphox Health Review and to see how it compares to using InsideTracker.Why Siphox? So why did I decide to give Siphox a try? If you've read my review of...
Growing Oyster Mushrooms with Hardwood Fuel Pellets
Most people who grow oyster mushrooms do so on a straw based substrate. This always seemed odd to me. Oyster mushrooms naturally grow on hard woods. In addition to this, making straw reasonably sterile for growing purposes is really annoying. I was surprised that there weren't more instructionals on using hardwood fuel pellets for growing oyster mushrooms. With the advent of pellet stoves and pellet grills, the availability of a wide variety of hardwoods in this format has grown exponent...
Building a Backyard Food Forest
I've written before about my desire to turn my backyard into a food forest using edible landscaping. I've always imagined a lush, thriving garden that requires minimal effort yet provides a bounty of products—all while resembling a natural forest ecosystem. My process of building a backyard food forest started after encountering the concept of permaculture. Rooted in ecological principles, permaculture is a holistic approach to creating sustainable systems that mimic nature’s patter...
<100 subscribers
<100 subscribers
Grafting apple trees is one of the most rewarding skills a home gardener or orchardist can learn. It’s the ancient art of joining two different plants together so they grow as one, allowing you to replicate your favorite varieties, create multi-variety trees, or save a cherished old tree. While it might seem like a magical process, apple grafting is a straightforward technique that anyone can master with patience and attention to timing.
I started investigating apple grafting as part of my quest to create a backyard food forest. My intent, is to walk you through the entire grafting process, broken down by season, to ensure you’re doing the right tasks at the right time for maximum success.
Before we dive into the seasonal steps, let’s quickly cover “why” apple grafting is such a great hobby! Grafting allows you to:
Clone specific varieties: Apple seeds don’t grow true to type. The only way to get a ‘Honeycrisp’ apple is to graft a piece of a ‘Honeycrisp’ tree onto a rootstock.
Control tree size: By selecting specific rootstocks, you can dwarf a tree, keeping it small and manageable for the home garden.
Repair damaged trees: You can graft new growth onto an older tree that has suffered damage.
Create novelty trees: You can grow multiple varieties (and even different fruit) on a single tree for a longer harvest season and a beautiful conversation piece.
Winter is the season when apple trees are dormant. While your trees are resting, it’s time to get everything ready. This is the most crucial phase for setting yourself up for success.
Your rootstock is the foundation of your tree. It determines the tree’s ultimate size, vigor, and disease resistance. For home gardeners, dwarfing or semi-dwarfing rootstocks are often preferred.
Dwarfing (like M9 or M26): Produces small trees (6-10 feet), perfect for small spaces or espalier. They often need staking.
Semi-Dwarfing (like M7 or MM106): A great all-around choice, producing trees 10-15 feet tall. They offer a good balance of vigor and size control.
Standard (like Seedling): Produces large, vigorous trees (20+ feet). Best for large properties.
Order your bare-root rootstock from a reputable nursery early in the winter so they arrive in time for spring planting. You can also grow your own rootstock using a process called stooling, from suckers on existing trees.
Scion wood is the 1-year-old twig you will graft onto the rootstock. This wood contains the genetics of the desired apple variety.
When to Collect: The best time is in late winter (January-February) when the trees are fully dormant.
What to Look For: Select healthy, vigorous shoots from the previous year’s growth. They should be about the thickness of a pencil (roughly 1/4 to 3/8 inch) and have several prominent buds. Avoid water sprouts or wood from diseased branches.
How to Collect: Use sharp, clean pruners to cut 8-12 inch long sections.
How to Store: This is critical. Bundle your scions by variety, label them clearly, and store them in a sealed plastic bag with a slightly damp paper towel in the crisper drawer of your refrigerator (35-40°F or 1-4°C). They must stay dormant and moist but not wet. Properly stored scion wood can last for months.
Having everything ready prevents a frantic search when it’s time to graft. You will need:
Sharp Grafting Knife: A specialized knife with a beveled edge on one side is essential for making clean, smooth cuts. A utility knife can work in a pinch.
Pruning Shears: For collecting scion wood and trimming the rootstock.
Grafting Tape: To hold the graft union together tightly. Some people also use rubber bands for this.
Spring is grafting season! This is when the sap begins to flow and the magic happens. The goal is to graft when the rootstock is just beginning to break dormancy but the scion wood is still fully dormant.
The ideal window is when the buds on your rootstock are just starting to swell (“bud break”), but your stored scion wood is still showing no signs of green. This ensures the rootstock is ready to provide nutrients, forcing the scion to wake up and grow.
You can graft scion wood branches onto existing trees, but for the purposes of this post, I’ll describe specifically grafting onto new root stock. This will create a new tree. There are many different techniques for apple grafting that are tailored to which of these processes you’re going to follow.
For beginners, the whip-and-tongue graft is the gold standard. It provides a large surface area for cambium contact and is mechanically strong, making it highly successful.
How to Perform a Whip-and-Tongue Graft:
Prepare the Rootstock: Trim your rootstock to the desired height, usually just above the root system for a new tree. Make a smooth, clean, angled cut (about 2-3 inches long) on the top.
Prepare the Scion: Take a piece of your stored scion wood and make a matching angled cut. The diameter of the scion and rootstock should be as close as possible.
Make the Tongues: On the sloping cut surface of both the rootstock and scion, make a single, straight cut down into the wood, about 1/3 of the way down from the tip. This creates a “tongue” on each piece.
Join the Pieces: Carefully slide the tongues together so the scion and rootstock interlock. This is the most important step. The cambium layers (the thin green layer just under the bark) on the scion and rootstock must align perfectly on at least one side. This is where the vascular connection will form.
Secure the Union: Wrap the graft union tightly with grafting tape. Start below the graft and working your way up, covering the entire wound. The goal is to hold the pieces together so firmly they cannot be moved apart.
If you are creating a new tree, you can now plant the grafted rootstock in its permanent location or in a nursery bed. Plant it so the graft union (the bumpy part where they join) is several inches above the soil line to prevent the scion from rooting on its own.
Your work isn’t over yet! Summer is all about monitoring the graft and encouraging it to grow successfully.
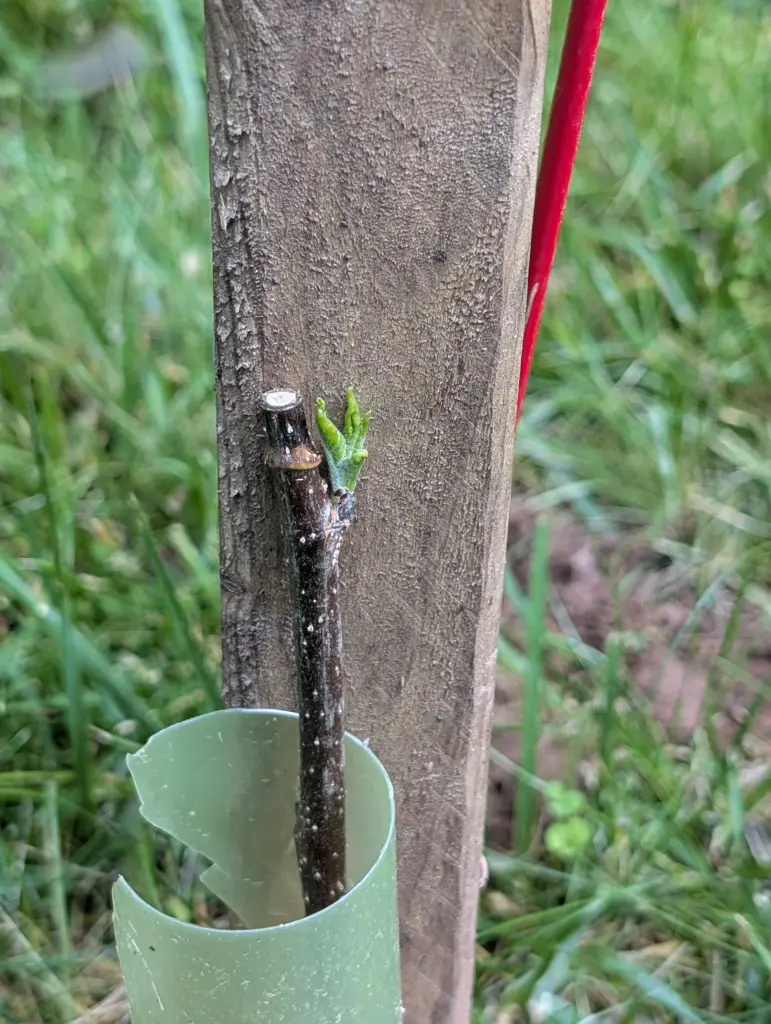
Within 4-8 weeks, you should see the buds on your scion begin to swell and break. This is the first sign of success! The leaves will emerge, and the graft will start to establish itself. Ideally, for new trees, you want to limit this growth to one main point. Knock off any buds beyond where you want your main point of growth to originate from.
The rootstock will likely try to send up its own shoots from below the graft union. These suckers will rob energy from your desired scion. Remove them immediately as soon as you see them by rubbing or pruning them off flush with the trunk.
New growth is tender. It is best to stake your tree to prevent the new graft from being broken. Make sure the support is above your tree’s growth as birds like to sit on these young trees… having a support that is higher than the tree will convince the birds to use that instead. In addition to this, I like to put a barrier around my trees to prevent deer and other animals from snacking on them.
Keep the soil consistently moist but not waterlogged. A stressed tree is less likely to put its energy into healing the graft union.
As the growing season winds down, you can assess your success and prepare for the winter.
By fall, your grafted scion should have produced several inches to a foot or more of new, healthy growth. The leaves should be a good color and the union itself should look swollen and calloused. If the scion never leafed out or died back, the graft failed. Don’t be discouraged; even experts have failures. You can reuse the root stock in the next year.
Stay vigilant about removing any rootstock suckers that appear.
Give your new tree a good deep watering before the ground freezes. Apply a thick layer of mulch around the base (but not touching the trunk) to insulate the roots and conserve moisture. This is also a good time to protect the young trunk from rodents and winter sun with a tree guard. Again, if you haven’t done something already to discourage deer, it’s worth doing this now as well.
Fall is the perfect time to evaluate your orchard plans. What worked? What didn’t? Now is the time to order or grow new rootstock and identify which trees you’ll want to collect scion wood from in the coming winter.
Grafting is a skill that connects you deeply to the rhythm of the seasons. I started out learning how to graft apples through a program provided by Seed Savers Exchange. Once you learn this process with apples, you can apply this knowledge to other trees and eventually enjoy crisp, delicious fruit, grown entirely by your own hand. Happy grafting!
Grafting apple trees is one of the most rewarding skills a home gardener or orchardist can learn. It’s the ancient art of joining two different plants together so they grow as one, allowing you to replicate your favorite varieties, create multi-variety trees, or save a cherished old tree. While it might seem like a magical process, apple grafting is a straightforward technique that anyone can master with patience and attention to timing.
I started investigating apple grafting as part of my quest to create a backyard food forest. My intent, is to walk you through the entire grafting process, broken down by season, to ensure you’re doing the right tasks at the right time for maximum success.
Before we dive into the seasonal steps, let’s quickly cover “why” apple grafting is such a great hobby! Grafting allows you to:
Clone specific varieties: Apple seeds don’t grow true to type. The only way to get a ‘Honeycrisp’ apple is to graft a piece of a ‘Honeycrisp’ tree onto a rootstock.
Control tree size: By selecting specific rootstocks, you can dwarf a tree, keeping it small and manageable for the home garden.
Repair damaged trees: You can graft new growth onto an older tree that has suffered damage.
Create novelty trees: You can grow multiple varieties (and even different fruit) on a single tree for a longer harvest season and a beautiful conversation piece.
Winter is the season when apple trees are dormant. While your trees are resting, it’s time to get everything ready. This is the most crucial phase for setting yourself up for success.
Your rootstock is the foundation of your tree. It determines the tree’s ultimate size, vigor, and disease resistance. For home gardeners, dwarfing or semi-dwarfing rootstocks are often preferred.
Dwarfing (like M9 or M26): Produces small trees (6-10 feet), perfect for small spaces or espalier. They often need staking.
Semi-Dwarfing (like M7 or MM106): A great all-around choice, producing trees 10-15 feet tall. They offer a good balance of vigor and size control.
Standard (like Seedling): Produces large, vigorous trees (20+ feet). Best for large properties.
Order your bare-root rootstock from a reputable nursery early in the winter so they arrive in time for spring planting. You can also grow your own rootstock using a process called stooling, from suckers on existing trees.
Scion wood is the 1-year-old twig you will graft onto the rootstock. This wood contains the genetics of the desired apple variety.
When to Collect: The best time is in late winter (January-February) when the trees are fully dormant.
What to Look For: Select healthy, vigorous shoots from the previous year’s growth. They should be about the thickness of a pencil (roughly 1/4 to 3/8 inch) and have several prominent buds. Avoid water sprouts or wood from diseased branches.
How to Collect: Use sharp, clean pruners to cut 8-12 inch long sections.
How to Store: This is critical. Bundle your scions by variety, label them clearly, and store them in a sealed plastic bag with a slightly damp paper towel in the crisper drawer of your refrigerator (35-40°F or 1-4°C). They must stay dormant and moist but not wet. Properly stored scion wood can last for months.
Having everything ready prevents a frantic search when it’s time to graft. You will need:
Sharp Grafting Knife: A specialized knife with a beveled edge on one side is essential for making clean, smooth cuts. A utility knife can work in a pinch.
Pruning Shears: For collecting scion wood and trimming the rootstock.
Grafting Tape: To hold the graft union together tightly. Some people also use rubber bands for this.
Spring is grafting season! This is when the sap begins to flow and the magic happens. The goal is to graft when the rootstock is just beginning to break dormancy but the scion wood is still fully dormant.
The ideal window is when the buds on your rootstock are just starting to swell (“bud break”), but your stored scion wood is still showing no signs of green. This ensures the rootstock is ready to provide nutrients, forcing the scion to wake up and grow.
You can graft scion wood branches onto existing trees, but for the purposes of this post, I’ll describe specifically grafting onto new root stock. This will create a new tree. There are many different techniques for apple grafting that are tailored to which of these processes you’re going to follow.
For beginners, the whip-and-tongue graft is the gold standard. It provides a large surface area for cambium contact and is mechanically strong, making it highly successful.
How to Perform a Whip-and-Tongue Graft:
Prepare the Rootstock: Trim your rootstock to the desired height, usually just above the root system for a new tree. Make a smooth, clean, angled cut (about 2-3 inches long) on the top.
Prepare the Scion: Take a piece of your stored scion wood and make a matching angled cut. The diameter of the scion and rootstock should be as close as possible.
Make the Tongues: On the sloping cut surface of both the rootstock and scion, make a single, straight cut down into the wood, about 1/3 of the way down from the tip. This creates a “tongue” on each piece.
Join the Pieces: Carefully slide the tongues together so the scion and rootstock interlock. This is the most important step. The cambium layers (the thin green layer just under the bark) on the scion and rootstock must align perfectly on at least one side. This is where the vascular connection will form.
Secure the Union: Wrap the graft union tightly with grafting tape. Start below the graft and working your way up, covering the entire wound. The goal is to hold the pieces together so firmly they cannot be moved apart.
If you are creating a new tree, you can now plant the grafted rootstock in its permanent location or in a nursery bed. Plant it so the graft union (the bumpy part where they join) is several inches above the soil line to prevent the scion from rooting on its own.
Your work isn’t over yet! Summer is all about monitoring the graft and encouraging it to grow successfully.
Within 4-8 weeks, you should see the buds on your scion begin to swell and break. This is the first sign of success! The leaves will emerge, and the graft will start to establish itself. Ideally, for new trees, you want to limit this growth to one main point. Knock off any buds beyond where you want your main point of growth to originate from.
The rootstock will likely try to send up its own shoots from below the graft union. These suckers will rob energy from your desired scion. Remove them immediately as soon as you see them by rubbing or pruning them off flush with the trunk.
New growth is tender. It is best to stake your tree to prevent the new graft from being broken. Make sure the support is above your tree’s growth as birds like to sit on these young trees… having a support that is higher than the tree will convince the birds to use that instead. In addition to this, I like to put a barrier around my trees to prevent deer and other animals from snacking on them.
Keep the soil consistently moist but not waterlogged. A stressed tree is less likely to put its energy into healing the graft union.
As the growing season winds down, you can assess your success and prepare for the winter.
By fall, your grafted scion should have produced several inches to a foot or more of new, healthy growth. The leaves should be a good color and the union itself should look swollen and calloused. If the scion never leafed out or died back, the graft failed. Don’t be discouraged; even experts have failures. You can reuse the root stock in the next year.
Stay vigilant about removing any rootstock suckers that appear.
Give your new tree a good deep watering before the ground freezes. Apply a thick layer of mulch around the base (but not touching the trunk) to insulate the roots and conserve moisture. This is also a good time to protect the young trunk from rodents and winter sun with a tree guard. Again, if you haven’t done something already to discourage deer, it’s worth doing this now as well.
Fall is the perfect time to evaluate your orchard plans. What worked? What didn’t? Now is the time to order or grow new rootstock and identify which trees you’ll want to collect scion wood from in the coming winter.
Grafting is a skill that connects you deeply to the rhythm of the seasons. I started out learning how to graft apples through a program provided by Seed Savers Exchange. Once you learn this process with apples, you can apply this knowledge to other trees and eventually enjoy crisp, delicious fruit, grown entirely by your own hand. Happy grafting!
Share Dialog
Share Dialog


No activity yet